Tips and Tricks for Improving Multiple Sclerosis

Muscles We Love: The Glutes
Improve sit to stand, balance, posture, and walking with this easy-to-work muscle group can for people with multiple sclerosis (MS).
Sir Mix-A-Lot rapped about it, dances have been named after it. Kim Kardashian and J. Lo are known for it. Yep, you guessed it, I’m talking about the butt or, more properly, the glutes.
From a functionality standpoint, the glutes are arguably the most important muscle group in the entire body. That goes double for people with MS. The glutes play key roles in sit to stand, balance, posture, and gait. When they are weak, they can not only lead to problems with those activities but also to soreness in adjacent joints such as the hips and knees as a result of adjoining muscles trying to compensate. With excess atrophy, the sacrum becomes the primary weight-bearing area for the lower body in bed, which can lead to soreness, burning, and even pressure sores. So yeah, when it comes to MS, you definitely do not want to bring that weak-ass, er, ass.
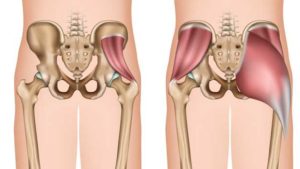
Figure 1: The glutes consist of (from right) the gluteus maximus, which overlays the gluteus medialis and gluteus minimus.
The glutes are made up of three separate muscles: the gluteus maximus, the gluteus medius, and the gluteus minimus (see figure 1). Each has its own specific function. Although there is spillover among them, each should be worked differently for best results. There are plenty of classic exercises for the able-bodied. Perhaps more important for people living with MS, the glutes are very easy to strengthen using NMES.
The gluteus maximus
It’s been called the muscle that enables man to stand upright. The gluteus maximus is a hip extensor, and one of the most powerful muscles in the body. As a hip extensor, it opens up the hip joint, moving the thigh backward and the torso upward. It’s a crucial muscle in sit to stand, giving you the pop to spring up, and once you’re up, it helps keep your body extended. Don’t believe me about the glutes assisting with standing? Put on the electrodes as described below. Stand up at a counter or someplace you have a sturdy handhold and wait for the current to come on. Your hips will shift forward and you will stand up very straight.
How to work the gluteus maximus with NMES
The gluteus maximus is a large muscle, so you will use the symmetric waveform (large muscle setting). This means that the current spends the same amount of time flowing from the red electrode to the black electrode as from the black electrode to the red electrode (see Getting Started with NMES). This will be more comfortable at the higher currents you need to excite the muscle. It also means that you don’t have to worry about where you place the red electrode versus the black electrode. That means simple and simple is good.
Table 1: NMES settings for gluteus maximus
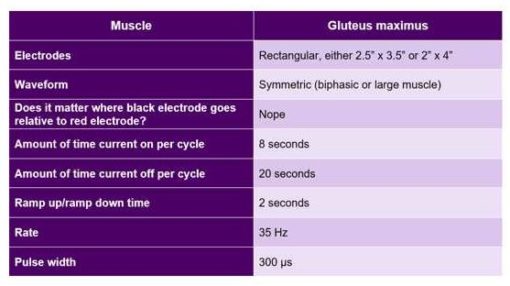
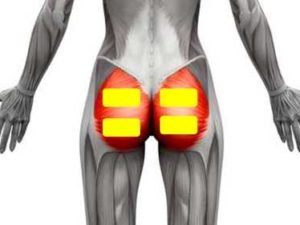
Figure 2: To work the gluteus maximus using NMES, apply rectangular electrodes oriented horizontally.
You will need two sets of rectangular electrodes. They should be placed horizontally with the electrode wires exiting to the outside (see figure 2). The positions shown are approximate. Everyone’s nerves are located in different positions. If you don’t get a strong muscle contraction, try repositioning the electrodes up or down until you do. Once you pull up your underwear (or not, if you go commando¾that’s between you and your god), gently adjust the wires until they are coming out of your waistband at the sides. This helps keep you from sitting on the wires.
The horizontal positioning ensures that the current runs vertically from one electrode to the other. If you switch the orientation and the current runs horizontally from electrode to electrode, it could excite the piriformis muscle, a small horizontal muscle that lies beneath the gluteus maximus (see figure 3). The piriformis is an external rotator, which means that it causes your legs and feet to turn out when it contracts, sort of like a ballerina (or a danseur – never let it be said that we are sexist here at HackMyMS). On the upside, this could be helpful if you have plans to dance Swan Lake. On the downside, under certain circumstances, over exciting the piriformis can cause the vicious sciatica-like pain when it tightens or spasms.
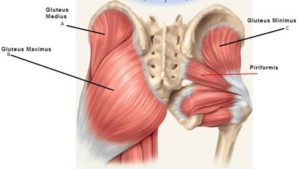
Figure 3: Numerous small muscles like the piriformis underlay the gluteus maximus and can be accidentally stimulated using NMES.
The best positions for working the gluteus maximus are either standing up somewhere you have a good handhold or reclining back in a chair or couch. When the current comes on, your glutes will clench and your hips will push forward. If you’re sitting upright, your hips will slide forward. To be safe, be sure you’re not sitting in an upright chair that will put you at risk of sliding right out.
Early on, I tried actively recruit my gluteus maximus by trying to do sit to stand when the current came on but the body dynamics are wrong. My routine is to put on glute electrodes at the end of the day before I relax back to read or watch TV. I run one or more 45-minute sessions. The next day, I will have more pop when doing sit to stand. I will also be more stable when standing.
How to work the gluteus maximus with exercise
There are a number of good exercises for working gluteus maximus. Although these exercises can also promote neuroplasticity, the improvements don’t appear as quickly. Exercise will strengthen the muscles, but it takes about three days to see results.
Exercises for the gluteus maximus include:
- Bridging: This is a great exercise that you can do lying on the floor or lying in bed – try doing a few before going to sleep. Raise up slowly, clenching your buttocks, count to three, and lower. This counts as one repetition. Aim for three sets of 10. If you can only do one, do one – and increase every couple of days. If your legs are spastic or if you have weak hamstrings, you may want to use a soft band such as the belt of a bathrobe in front of your ankles to keep your legs from skating out. If you have weak adductors (the muscles that keep your knees together), either tie your knees together with a band or ask a kind soul to stabilize your knees for you.
- Knee bends/squats: Knee bends/squats are great for improving sit to stand. They start out working your quads. The deeper you go, the more they strengthen your glutes and hamstrings. The gif below shows the ideal. In my case, I do knee bends while holding on to the edge of the kitchen counter to give myself extra support. My chair is behind me so that I can sit down if I go too low.Bend your knees and lower yourself toward the floor. Go as low as you can comfortably go while still feeling strong and controlled. Be conservative – if your legs feel weak, just dip a little bit and straighten back up. Maintain that level for a few days, then try to go deeper as you feel stronger. If all you can do is one rep, then do it. Add another rep a few days later. If you keep doing this, you’ll be at a full set of 10 by the end of the month. Aim for three sets of 10.
- Lunges: If you’re highly functional, lunges are excellent exercises for working the glutes. Make sure you have someone spotting you at first. Be conservative – fewer reps and not going very low initially. As you strengthen, make it harder.
Gluteus Medius (return to top)
The gluteus medius is partly covered up by the gluteus maximus so that only the upper 25% or so projects. The gluteus medius is a muscle we love because it performs several crucial tasks:
- Abducting the leg: In conjunction with the tensor fascia latae and the iliotibial band, the gluteus medius moves your leg out to the side. We call it an abductor, because it takes your leg away from the centerline of your body (your leg is abducted – although not actually kidnapped because you (presumably) know where it is).
- Abducting the knee: When your leg is bent at the knee, the gluteus medius is the muscle you use to move your knees away from the centerline of the body. So, if your knees cave in toward each other when you are standing, you need to strengthen your gluteus medius (as well as gluteus maximus and quads but gluteus medius is very important).
- Keeping your pelvis level: When you’re walking, the gluteus medius keeps your pelvis level when you swing one of your legs forward to take a stride. Now, this confused me a bit when I first read about it. I could understand the importance of abduction – I mean, who doesn’t want to walk across the room sideways or seriously throwdown at a club by doing the Bees Knees? But keeping the pelvis level? Yeah, probably not so interesting sounding… Unless I tell you that keeping your pelvis level is a crucial part of helping combat foot drop (I’m guessing I’ve got your attention now).
I’ll go through a detailed discussion of gait in another article but for now, just think about what happens when you walk. You roll onto your left foot while your right foot moves behind you. Eventually, you bend your knee right knee, flex your right ankle to raise your toe a bit, then draw your right foot forward to take a step. During that phase, which is known as swing through, the right side of your body is unsupported.
Remember, the gluteus medius connects the leg to the pelvis. While the right leg is off the ground, the pelvis is sort of cantilevered out from the left leg and held steady by the left gluteus medius. If you have a strong left gluteus medius, it will keep the pelvis level during swing through of the right leg. If you have a weak left gluteus medius, then your pelvis will sag down on the right side during swing through. That means it’s going to be harder to clear the ground during swing through. You’ll need more extreme flexion of the right leg and right ankle and you still might not be able to clear the ground with your right toe to take step. If you have foot drop, this just makes things worse. (Note: you can also have too much of a good thing. One of the ways people compensate for foot drop (also to be covered in another post) is by using the gluteus medius to hike up the hip extra high on swing through. That’s an unnatural motion that can cause instability and repetitive stress issues in the long term.)
For a very clear explanation of this phenomenon, complete with animation, view this video on everything you need to know about the Trendelenburg gait. Heck, it’s worth watching just for the dancing skeletons shown at the end.
How to work the gluteus medius with NMES
Strictly speaking, the gluteus medius is small muscle. If you are working it on its own, you should use an asymmetric (small muscle) waveform. But I generally work it simultaneously with the gluteus maximus on a two-channel box, so I use the large muscle setting for both.
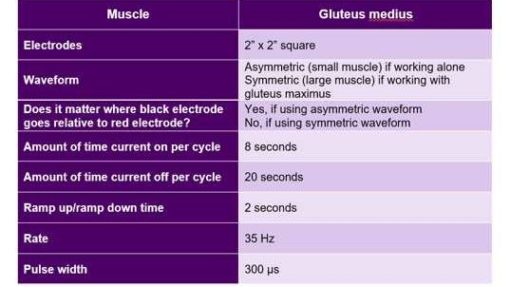
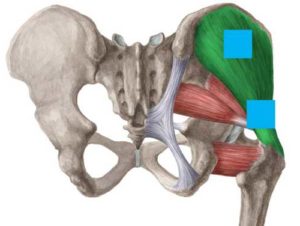
Figure 4: to work the gluteus medius with NMES, place one square electrode at the narrow bottom of the muscles and one electrode about 2 inches from the top.
To work the gluteus medius, you will use 2” x 2” square electrodes, placed with the wires extending upward. Put the black electrode at the bottom, over the motor point of the muscle. Put the red electrode at the top. If you want to increase your ability to rotate your foot and your leg in, move the electrode more toward the inside of the muscle (toward your spine). If you need help rotating your foot and leg outward, then place the top electrode more toward the outside of the muscle.The two electrodes will be separated by a couple of inches, which will cause the current to travel more deeply. This is a good thing – you want the current to go underneath the gluteus maximus to reach the medial glutes.
There are a number of good exercises for strengthening the gluteus medius:
- The clamshell: The clamshell is one of the top exercises you can do to strengthen your gluteus medius. The best part is that it can be performed on the floor or on your bed. Lie on your side, knees bent. Keep your pelvis perpendicular to the floor. Keeping your ankles together, raise the knee of the upper leg upward. Hold for a count of three then lower it. Do what you can but aim for three sets of 10. Note, this is an easy one for someone to assist. Loop the belt of a rope around your knee and have them pull upward as you are trying to raise your knee. Even if they have to do the entire upward motion, you can still get benefit by controlling the knee as you lower it (back when I was seriously into lifting weights, we called that taking the negative).
- Side lying leg raises: This exercise is similar to the clamshell, only you do it with your legs straight. If it’s too difficult, try a gravity free version – sidestep to one side, then sidestep to the other. Do what you can but try for three steps. If you feel it all unsteady, do this at the kitchen sink where you can hold on. If you can’t do two or three, settle for one. If you have issues getting your foot off the ground, try standing on an aerobic step with the left foot while moving the right leg out to the side, then reverse.
- The fire hydrant: This is another variation on the clamshell. Get on your hands and knees. Stabilize. Tighten your core and raise one leg to the outside with the knee still bent. Do what you can but aim for three sets of 10. Not only does it strengthen your gluteus medius, it gives you a fresh way to bond with your dog. You’re welcome.
Working the gluteus maximus and gluteus medius together with NMES
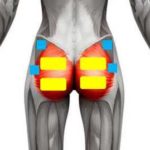
Figure 5: with a two-channel box, you can work the gluteus maximus and the gluteus medius at the same time. Position the electrodes as shown.
The gluteus minimus (return to top)
No, I didn’t forget about the gluteus minimus. It’s a very small muscle that hides out underneath both the gluteus maximus and gluteus medius.
In terms of function, the gluteus minimus is kind of the lil’ buddy of the gluteus medius. It performs several of the same functions, including
- Keeping the pelvis level
- Leg abduction
- Internal rotation of the leg
Because it’s both tiny and also lurking beneath the gluteus maximus and gluteus medius, the gluteus minimus is almost impossible to in isolation using NMES. The good news is that because it’s part of the gluteus posse, several of the exercises used to work the other glutes provide benefits to the gluteus minimus, including:
- Side lying leg raises (or sidesteps or leg abductions)
- The fire hydrant
- The clamshell (limited activation)
There are other options but they’re all more extreme than I want to feature here – I invite you to consult The Oracle (a.k.a., the Internet) if you want to learn more.
So there you have it, a menu of ways to work these critical muscles. Find one that fits your abilities and do it. You don’t have to be perfect or do a million reps the first time out of the gate. The important thing is to start. If you can do one minute, then do one minute.… And add another minute the next day. Keep at it and you will see a difference, I promise.
Disclaimer
Hack My MS provides news and information only. It is an account of my own experiences and some techniques that have worked for me. It should not be construed as medical advice, nor is there any guarantee that any of these techniques will work for you. Always check with a medical professional before starting any exercise program, treatment, or medication. Do not discontinue any exercise program/medication/treatment or delay seeing a doctor as a result of anything you read on this site.
0 Comments