Tips and Tricks for Improving Multiple Sclerosis

Sit to Stand
Learn the phases and the muscles involved in this essential activity of daily living, as well as how to work those muscles with exercise and neuromuscular electrostimulation (NMES).

[AUTHORS NOTE: I mention a number of specific muscles in this article. I haven’t covered all of them on the site as yet, but they are in the queue. Be patient and check back or sign up for the newsletter to be notified when new articles get posted.]
Sit to stand is a key part of the activities of daily living. You need to stand up and be counted, stand up for your rights, stand up for others, and (let’s be real here) stand up to get the cookies out of the cupboard (ooh, who said that? Bad dog! Bad dog!) It may seem simple when you’re healthy but it’s actually a surprisingly complex motion that requires strength, timing, and momentum.
You learn the motion when you’re a kid and it becomes part of your muscle memory. And then MS hits and flips the bird to muscle memory. Suddenly, getting off the couch to do something essential like head to the, er, throne room becomes a massive challenge (not to mention getting off the danged throne to rejoin humanity when you’re done!)
Bodybuilders, the good ones, are obsessed with using proper form when they lift. Bad form invariably makes it easier to lift heavier weights because you’re using the wrong muscle – you’re cheating. Something similar happens when you get progressively disabled. When one muscle group gets weak because of demyelination, you unconsciously compensate by finding other ways to accomplish the motion. Gradually, you forget the techniques you learned as a kid. You learn a new muscle memory that’s ultimately ergonomically unsound. That makes the motion harder, slower, and less safe.
Let’s take the process the other way, starting with reviewing how sit-to-stand is supposed to work. By strengthening weak muscles and focusing on good form, you can unlearn those bad habits and reestablish muscle memory (thus flipping the bird back to MS).
Understanding the motion
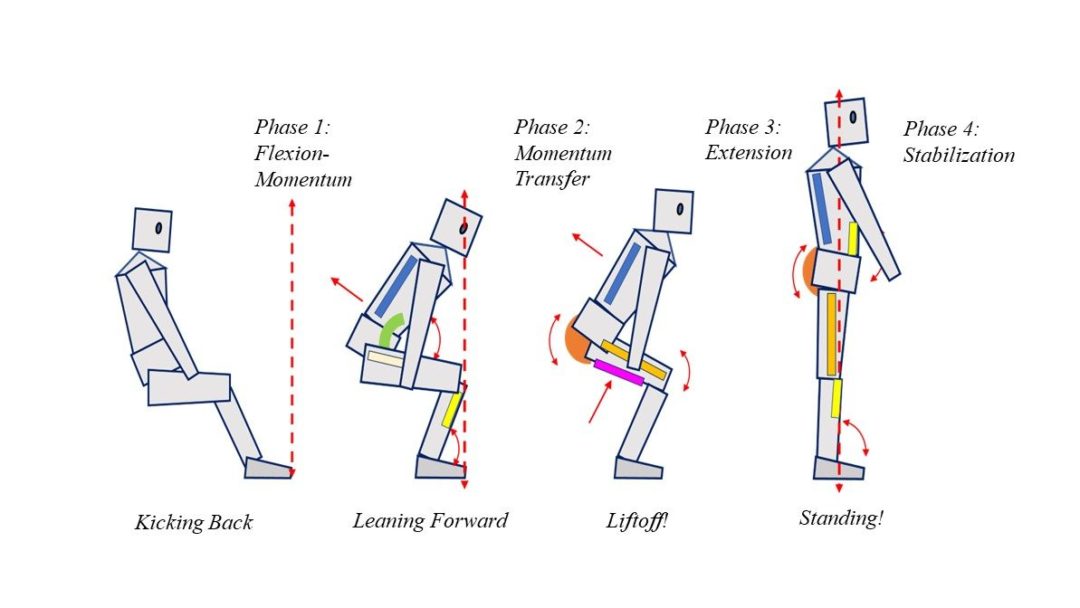
We can divide the sit to stand movement into four phases: flexion Momentum (ending up in nose over toes), momentum transfer (culminating in liftoff), extension (culminating in standing up), and stabilization (see figure 1). Let’s take a closer look at each:
-
- Phase 1: Flexion-Momentum: More than likely, when you decide to stand up, you’re probably leaning back in your chair with your feet out ahead of you. Even with somebody pulling on your arms to help you, it’s hella hard to get up from this position. Not to go all motivational speaker on you but if you want to rock sit-to-stand, you’ve got to position yourself for success – literally.
So, the first phase of sit-to-stand is to flex at the waist to move into the “nose over toes” position so that all of the effort you put into standing goes upward. Move your feet back so your toes are under your knees and lean forward so that your center of gravity (head and upper torso) is over your feet. Many chairs have a dump – the seat slants a little toward the back – so you may need to scoot forward so that you are closer to the edge of the chair.
For healthy people (and you, depending on how high functioning you are), this flexion phase takes place quickly enough to create some forward momentum. This leads naturally into the next step which is…
- Phase 2: Momentum Transfer: In this phase, that forward momentum that you might’ve had gets transferred into upward momentum to start liftoff (no need to call Houston). You start this phase in the leaning forward position and ended by raising your thighs and buttocks up off the chair. Even if you are statically in position at the start of the phase, if you can straighten your torso about and then lean forward quickly when you attempt to stand, it will be easier.
- Phase 3: Extension: In this step, you push your feet into the floor and extend your hip joints and knee joints. Basically, in real person language, this is the standing up part.
- Phase 4: Stabilization: Standing up isn’t particularly helpful if the next minute, you’re back down on the floor (known to MSers as The Bad Place). So yeah, stabilization is kind of important. This step involves straightening your torso, raising your head, and getting your shoulders back.

Muscle by muscle
Now, let’s take a look at the key muscles involved at each step (see figure above to identify muscles):
- Leaning forward: Rectus abdominus (peach) and hip flexors (green) to pull your torso forward, and the erector spinae (blue) and trapezius keep your back straight and your butt back.
- Liftoff: You probably assume the gluteus maximus (brick) plays a role in raising your behind off the chair, and you’d right, but other muscles come into play, including your hamstrings (magenta) and your quads (orange). Your hamstrings are knee flexors but they are also hip extensors, which is how they come into play for standing up. The liftoff step also uses your erector spinae to keep your hips back in order to maintain the nose over toes posture.
- Extension: Your quads assist with your knee extension. Your glutes and your hamstrings assist with hip extension, and your erector spinae enable you to straighten up.
- Stabilization: This is a whole body activity – glutes, quads, calf muscles, and core.
Sit-to-stand – the fabulous four
Here are my favorite exercises to improve sit to stand.
- NMES of the gluteus medius and gluteus maximus
- NMES of the rectus femoris (and the vastus medialis oblique (VMO) while you’re at it
- NMES of the hamstrings
- Step ups or stairs: hands down, the best exercise you can do to improve sit-to-stand motions.
Troubleshooting sit-to-stand
If your hips swing forward when you stand, strengthen your
- Erector spinae to hold your behind back
- Hip flexors to keep your center of mass over your toes
- Abdominals to keep your center of mass over your toes
If you feel like you’re falling backward when you stand, strengthen your
- Tibialis anterior (front of the calf) to help you move your body forward
- Abdominals and hip flexors to keep your center of mass over your toes
If you bend forward at the hips once you’re up and can’t fully extend your torso and stabilize, strengthen your
- Gluteus maximus for the hip extension
- Erector spinae for the back extension
- Trapezius to help raise your head up
- Abdominals to support your core
If your knees cave in toward one another, strengthen your
- Gluteus medius
- Quads
Always think about tomorrow
Okay, there’s a lot going on in sit-to-stand and lots of things to work on. Don’t let it overwhelm you. Pick one thing and do what you can do. If that means one rep of an exercise or five minutes of NMES, then that’s what you do – and you work on doing a little more tomorrow.
Tomorrow is always top of mind for me. What can I do today that is going to make me more functional tomorrow? That’s the thing to concentrate on. If sit-to-stand gets a little bit easier, then you’ll do it more. Every time you perform the motion, you’re challenging the muscles and they’re getting stronger and neural patterning is going on. Every time you perform the motion, you’re getting better and it will get easier. This is how you hack MS.
In closing, just a reminder, I will be putting up modules on each of the muscles I mention above; it’s just not going to happen all at once. Please be patient and check back or sign up for notifications. There is also a wealth of info on the web for exercising different muscle groups. You won’t find much on NMES, but that is what this site is for. Happy trails, hackers!
Disclaimer
Hack My MS provides news and information only. It is an account of my own experiences and some techniques that have worked for me. It should not be construed as medical advice, nor is there any guarantee that any of these techniques will work for you. Always check with a medical professional before starting any exercise program, treatment, or medication. Do not discontinue any exercise program/medication/treatment or delay seeing a doctor as a result of anything you read on this site.

0 Comments